- Prepare written lectures that can be uploaded into Canvas modules as a PDF. Keep in mind that the bandwidth of Canvas may be limited starting on March 23rd, so using a synchronous lecture delivery method may not work.
- Search for YouTube video lectures to supplement the written content that can also be uploaded to Canvas.
- Prepare weekly assignments such as homework, quizzes, reading, etc.
- Setup a discussion board or 'Raise Your Hand' features on Canvas to communicate with and get feedback from students.
- It is important to keep a consistent structure from week to week so that students can easily understand and follow expectations!
Set up a module in Canvas:
- Log into your MyUSF page.
- Hover your cursor over Learning & Teaching Tools and select CANVAS (this will open a new browser tab or window).
- On the Canvas Dashboard, you should see a box for the course(s) you are currently teaching. Click on it.
- Once in the course, if you do not see Modules as an option, select Settings from the menu on the left.
- In the Course Settings, select the Navigation tab and drag Modules from the 'Drag items here to hide them from students.' section into the 'Drag and drop items to reorder them in the course navigation.' section. Click 'Save' at the bottom of the page.
- Click on Modules, which should now show up in your navigation menu on the left.
- In the Modules page, use the '+Module' button to add a module
to your course. It is suggested that you use one module per week in
order to keep things organized. Name your module and click 'Add
Module'. To publish the module so students can see it,

- Once you have added the module, you can add assignments, quizzes, files, pages, discussions, and other things to the module.
- You can set an unlock date, add pre-requisites, and other options by clicking on the vertical '...' on the right.
Add PDF notes plus lecture audio to a module in Canvas:
(there are multiple ways to do this - this is just one method)
- Go to the Files section on Canvas in your course. If you do not see that as a navigation option, you can add it as described above for Modules on the Settings/Navigation page.
- In the Files section, create a folder using the '+Folder' button.
- Click on the folder you created and then use the 'Upload' button to add a PDF file or files to the folder.
- Right click on the PDF file you just uploaded and select 'Copy Link Address' or something similar.
- Open the Modules section in another browser tab/window and click the + symbol (pictured above) to add something to it.
- Select 'Page' from the drop-down menu.
- Select [New Page] and give it a unique name like 'Week 10 Lecture 1', and click 'Add Item'.
- Then click on the page you have created. Near the top of the page on the right, click the 'Edit' button.
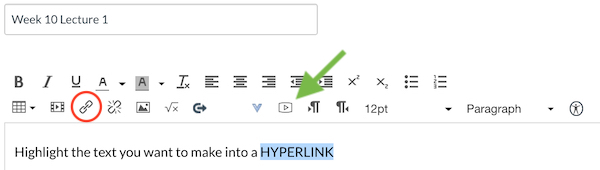
- In the edit box, you can add a link the PDF file by typing out
some text, highlighting what you want the linked text to be, and
then clicking the hyperlink button circled in red:
- A 'Link to Website URL' box will appear, and you can then paste
the link to the PDF document there that you copied from the Files
section. Typically this will default to a link that automatically
downloads the PDF. If you would like it to just be a link to the
document, then delete this part of the link:
https://usflearn.instructure.com/files/67214599/
download?download_frd=1 - To add a video or audio file to the page, click the 'Record/Upload Media' button indicated with the green arrow. You can then use your computer's webcam and/or microphone to record video and/or audio which will embed on the page. Clicking the 'Mic' and 'Webcam' buttons will enable or disable those options.
Set up a class discussion in Canvas
(there are many, many options not included here)
- In the Modules section on Canvas in your course, click the + symbol and select Discussion from the drop down, select [New Topic], and give the discussion a unique name like 'Week 10 Lecture 1: Discuss!'
- Then click on the discussion you just created and click the 'Edit' button to give it a description or perhaps a motivating question (students will be able to see this before the discussion opens), and choose the options you want.
- In order to encourage participation, making it a 'Graded' discussion is likely best. You may wish to also choose Peer Reviews which requires students to comment on another person's comment or question before they can receive credit for the discussion.
- Set the due date and dates of availability for students. The availability dates should likely go until the end of the course.
- Once you are done, click 'Save & Publish'.
Additional Options for Lectures:
(with additional functions not available in the above option)
- Blackboard Collaborate Ultra (Hari Srikanth demonstrated)
- Options: share screen, chat, raise hand, record sessions
- USF's Tutorial: Blackboard Collaborate Ultra
- Panopto Cloud (tool in Canvas)
- Options: record sessions, NOTE: session will eventually be archived
- USF's information: Panopto
- Logitech Spotlight (pointer, highligher tool for purchase)
- Options: pointer, highlighter, slide control, more...
- Logitech's Website: Spotlight